How to Insert Page Numbers in Excel Worksheets
If your work involves printing your excel worksheets, it’s a good idea to insert page numbers in it.
Inserting page numbers in Excel takes a little more work as compared with other Microsoft applications such as Word or PowerPoint.
Watch Video – How to Insert Page Numbers in Excel
This Tutorial Covers:
How to Insert Page Numbers in Excel
In this tutorial, you’ll learn how to insert page numbers in Excel worksheets.
- How to Insert Page Numbers in Excel using the using the Page Layout View.
- Insert Page Numbers in Excel Using the Page Setup Dialogue Box.
- Start Page Numbering with the Desired Number.
- Change the Order in which pages are numbered.
- Remove Page Numbers from the Excel Worksheets.
Insert Page Numbers in Excel: Page Layout View
If you want to insert page numbers in all the pages of a worksheet, using the page layout view is the fastest way to do it.
Here is how to do this:
- Go to View –> Workbook Views and select Page Layout.
- Scroll Down to the end of the page where is says Click to add footer .
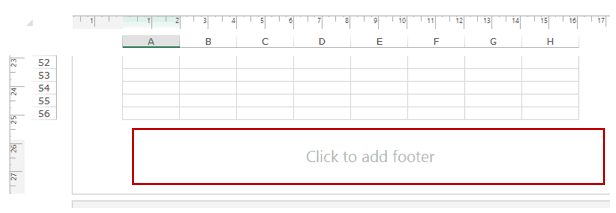
- There are three boxes in the footer. Click on the one where you want to insert the page number.
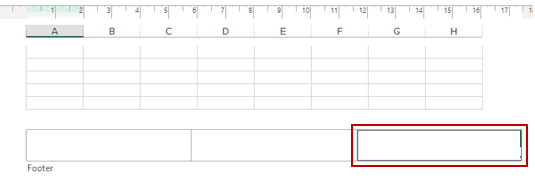
- As soon as you click on any of the boxes, the Header and Footer Tools Design tab appears.
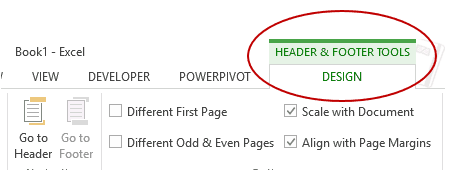
- Go to Design –> Page Number.

- This will insert a code &[Page] in the box.

- Enter the word ‘of’ in front of the code and click on Design –> Number of pages. This will insert the code &[Pages] .

- Click anywhere in the worksheet. Now the page numbers would be visible at the bottom of each page.
Note that these page numbers are visible only in the Page Layout view. You would not see it when you go back to the normal view. If you print the worksheet, the page numbers also get printed.
Have a Different First Page Footer
You may want to have a different text in the footer on the first page, and regular page numbers of other pages. For example, on the first page, you may want to have Company’s name/website or copyright info along with the page number.
Here is how to do this:
- While in the Page Layout view, select the footer box in the first page where you want to insert the text.
- With the box selected, go to Design –> Options and check the Different First Page option.

- Enter the text that you want to display on the first page only. Let’s say, I want to show my website name in this case.
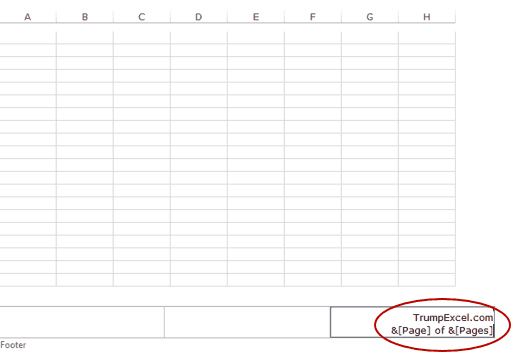
- Click anywhere in the worksheet.
Now, whatever you have entered in the first page would only be visible on the first page and rest all the pages would show page numbers.
Have Different Odd and Even Pages Footer
If you want to have different page numbers for odd and even pages, you can easily do this using the inbuilt settings.
For example, you may not want to show page numbers on even pages.
Here is how to do this:
- Go to View and select Page Layout view.

- Scroll down and select the footer where you want to insert the page numbers in Excel.

- Click on the box where you want to insert the page number.

- Go to Design –> Options and check Different Odd and Even Pages.

- Now when you click on the box on odd pages, in the bottom left, it would show Odd Page Footer. Enter the format in which you want the page numbers on odd pages. Similarly, enter the page number format on even pages, or leave it blank if you don’t want page numbers on even pages.
Insert Page Numbers in Excel: Page Setup Dialog Box
You can also insert page numbers in Excel using the page setup dialogue box.
Here is how to do this:
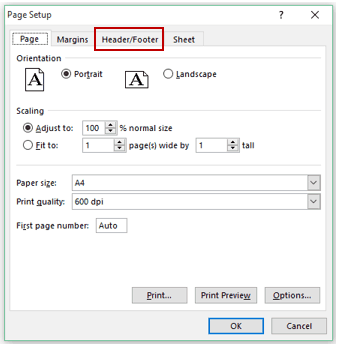
- Go to Page Layout tab –> Page Setup. Within the Page Setup Group, click on the dialogue launcher.
- This will open the Page Set dialogue box.

- In the Page Setup dialogue box, select the Header/Footer tab.
- In the Footer drop-down, select Page 1 of ? option. You will see the output format right below the drop-down.
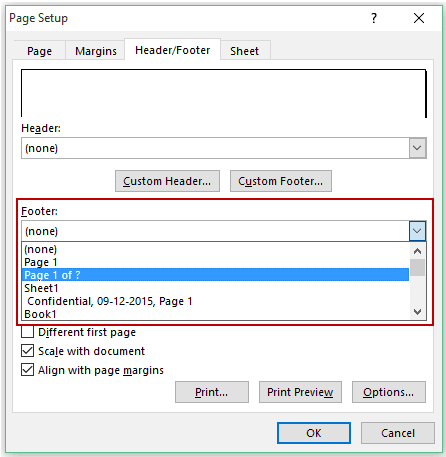
- Click OK.
This will instantly insert page numbers in Excel. If you want to insert page numbers in on the active worksheet only, follow the above steps. If you want to insert page numbers in multiple worksheets, select all the worksheets (hold the SHIFT key and select the worksheet tabs) and then follow the above steps.
Start Page Numbering with the Desired Number
If you are printing a report which is a continuation of some other report, or which is a part of some the overall report, you may want to begin page numbers with a different number (instead of 1).
- Go to Page Layout tab –> Page Setup. Within the Page Setup Group, click on the dialogue launcher.
- This will open the Page Set dialogue box.

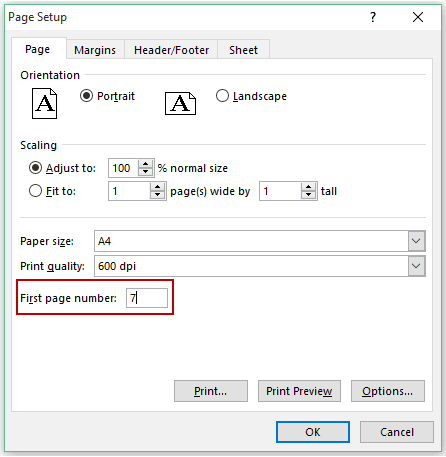
- In the Page Setup dialogue box, within the Page tab, change the First Page Number field from Auto to the number that you want to show/print.
Change the Page Order while Numbering
If you have a large data set, by default, Excel would first insert page numbers to the all the sheets going down, and then move to the right and then number those sheets.
If you want to change the order, you can do this by following the below steps:
- Go to Page Layout tab –> Page Setup. Within the Page Setup Group, click on the dialogue launcher.
- This will open the Page Set dialogue box.

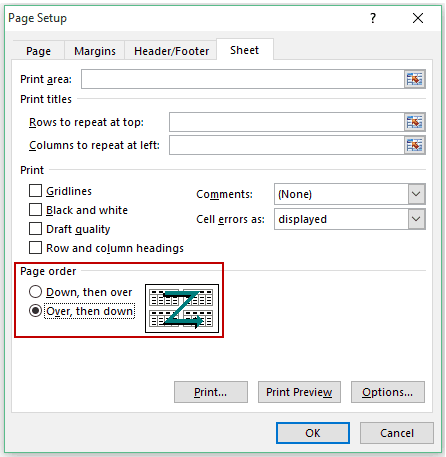
- In the Page Setup dialogue box, select the Sheet tab and change the page order from Down, then over to Over, the down.
Remove Page Numbers
To remove page numbers:
- Go to View and select the Page Layout view.
- Scroll down and select the footer where you see the page numbers.
- You would notice that as soon as you click on the box with the page number, it would change into a code. Delete that code .
- Click anywhere else on the worksheet.
You may also like the following Excel tutorials:
- Insert Page Numbers in Excel Worksheets – MS Help.
- How to Insert a Check Mark (Tick ✓) Symbol in Excel
- How to Quickly Insert Date and Timestamp in Excel
- How to Insert a Watermark in Excel
- How to Print Excel Sheet on One Page
- How to Insert Page Breaks in Excel (& Remove, Delete Page Breaks)


